3 tutorials for decorating your party tables
That's it, we're just one week away from the holiday season! In this new article, I wanted to share three tutorials with you! A few weeks ago, I suggestedsewingyour own Christmas gifts. Here, we're going to look at howto recycle fabric scrapstodecorate our holiday tables. Whether it's for Christmas or New Year's Eve, the choice is yours 😉.
Good news! You're going to love these tutorials because:
- they areaccessible to beginners,
- For two of them, youdon't evenneed a sewing machine!
- They'refast!
In order of appearance, we will see how to make the following for your festive tables:
- aChristmas tree-shaped cutlery holder,
- aplace card,
- atowelthatforms apretty bow.
So, are you ready to enhance your festive tables with recycled materials? Come on, it's time to dig out your scraps of red, green, gold, and silver fabric 🎉
The tree that carries your cutlery to your festive tables!
We'll start with the simplest of these tutorials. It's aChristmas tree-shapedcutlery holder.
MATERIALS:You don't need a sewing machine forthis DIY project, but you will need athick fabric that doesn't fray. I used a piece of wool fabric that I had used to sew a coat. But you can also usefelt. If you're not a natural artist, you'll also need aChristmas tree-shaped template (or pattern). Since I'm nice 😁😁, you can download the pattern .
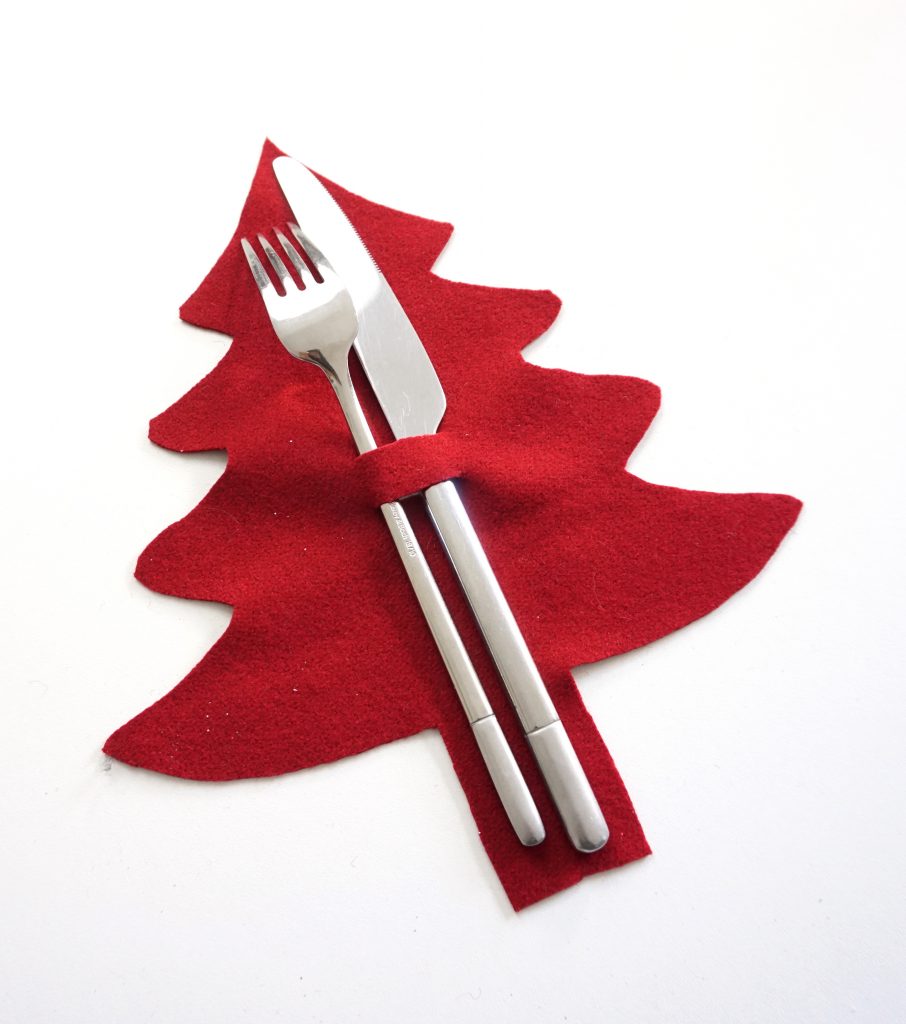
Step 1:Foldyour fabric remnant in half. Then, after downloading the template, cut it out and place the side with the double arrows on the fold of the fabric.

Step 2:Pinthe template to the fabric and cut the fabric along the outline of pattern. When you have finished, don't forget to mark the two central notches on the fabric with small cuts. Caution: to avoid damaging your scissors, be careful not to cut the paper when cutting the fabric.


Step 3:Removethe pins. Then, with the fabric still folded, extend the notches (the center marks). On the folded fabric, each notch measures approximately 1.5 cm.

Step 4:Unfoldthe fabric and place your cutlery in the slit. You can also hang a few small decorations on this slit!

Place cards on your festive tables
If you have large tables and want to seat your guests, have you thought about place cards? In this tutorial, I'll show you how to make them usingcardstockandfabric.

MATERIALS:cardstock, scraps of cotton poplin, a hot gluegun, a craft knife, a ruler, a set square.
Step 1:
Cut a square (8 cm x 8 cm) from cardstock. Then mark the middle of two parallel sides and use these to fold the paper in half.


Step 2 (optional):
I had fun adding an extra decoration to this place card. To do this, I drew a small Christmas tree just above the fold made in step 1. The base of the tree stops at the fold in the paper. Then I cut out the tree using a craft knife, taking care not to cut the base of the tree.


Step 3:
From my cotton poplin scraps, I cut a strip measuring 3 cm wide by 30 cm long.
Step 4:
I then ironed this strip to form a bias. To do this, using an iron, fold the strip of fabric in half lengthwise, wrong sides together. This first fold will serve as a guide.

Then, still working lengthwise, fold one side of the strip so that its edge touches the middle of the strip (the fold you made earlier). Iron as you go to secure this new fold.

Do the same with the other side of the strip by folding and ironing it.

Step 5:
Now we are going to glue the bias tape onto the "lower" part of the paper (just below the fold). To do this, we will use the hot glue gun.Be careful: this glue dries very quickly (in just a few seconds), so don't waste any time while gluing. Also, be careful not to burn yourself! Apply a strip of glue (about 5 mm wide) just below the fold in the paper, then quickly glue one of the long sides of the bias tape in place.


Next, use the creases made by the iron to glue the second part of the bias tape. To do this, apply a second strip of glue just below the first one, and glue the right side of the other long side of the bias tape.


Step 6:
Turn the place card over and trim the excess bias tape on one side. Then glue this side to the inside of the place card.


Do the same with the other side of the bias tape.


Step 7:
Repeat these steps to create as many place cards as you want. Then write your guests' first names on them!

A napkin tied in a bow on your party tables
For this last tutorial, we're going to sew ourselves a pretty towel!
MATERIALS:a60 cm x 60 cm square of cotton poplin,anapkin ring.

Step 1:
First, we will hem all four sides of this square. To do this, fold one side over 1 cm and iron it. Then fold the same side over 1 cm again and iron it. To hold this fold in place, secure it with a few pins.


Do the same with the other sides.
Step 2:
Let's move on to the sewing machine! We're going to sew these hems on the inside of the towel; this means that when we sew, the fold is visible, making it easier to be precise. We'll need to sew as close to the fold as possible. For this tutorial, it willbe 2 mm from the fold. To do this, I positioned one side of my square under the presser foot so that the needle was just above the fold.

Then I lowered my presser foot. On my machine (Brother FS40), you can see that the "slot" in the presser foot is perfectly aligned with the fold. This slot will serve as a guide to help me sew a straight seam! Next, to ensure that my seam was 2 mm from the fold, I simply moved my needle 2 mm to the right.Feel freeto watch the video at the beginning of the article if this is unclear.

Step 3:
There you go, we're ready to sew everything together. Start with two backstitches, then continue sewing normally along the side. And don't forget to use the slot in the presser foot (it's our guide) to help us sew a straight seam.

But what should you do when you reach a corner? Don't panic! When the needle is 2 mm from theperpendicular fold, leave the needle in the fabric, lift the presser foot, turn the square so that it is facing the right direction again, lower the presser foot, and you can resume sewing!


Step 4:
Continue sewing around the edge of the square. At the end, when you reach the initial seam, make two backstitches again.

Step 5:
Fold the square in half diagonally. Then roll up the triangle, starting at the top. Make several even folds until you reach the fold.


Then,at one-thirdof the way along oneside, fold the strip inward. Do the same with the other side.


Then threadthe napkin ring onto the plate. Ta-da! Your pretty bow is ready to be placed on a plate!


So, what did you think of these three tutorials? Which one do you prefer for your holiday tables?
See you soon!
Cadia